What do you think of when you hear the phrase “comfort foods”? Mac and cheese? Chicken Noodle soup? Spaghetti and Meatballs? Chocolate and Ice cream? I always think of warm foods. Something earthy and comforting, that seems to wrap you up in its aroma as it’s being made and then continues to make you feel warm and lovely from the first bite to the last.
I’d been waiting to try a new recipe from a cookbook my husband gave me until the weather started to turn cool and I needed some comfort. The opportunity came early this week. I had fairly high hopes, but this recipe didn’t merely exceed my expectations, but shattered them. It was warm, rich, comforting, and gooey. It had a well-developed depth of flavor. It contains over a pound of seasonal veggies. AND it’s pretty to boot!
This recipe will be a staple at our table for the next few months, until warm weather returns and it’s time to start embracing raw veggies again. The only change we would make? Husband would like sausage. I actually agree with him. This dish is just perfect as is, but a nice appley-sausage would put it over the top. We’ll definitely be trying that next time (i.e. next week!). Oh! I also halved the original recipe, not sure how we’d like it – COLOSSAL mistake. So, you can easily double it and make two galettes (fancy word for essentially an open “pie”), or you can make one really huge one.
Butternut Squash & Caramelized Onion Galette
from Smitten Kitchen Cookbook
Pastry
1 1/4 cups whole wheat pastry flour (I used about half whole wheat pastry, and half sprouted whole wheat flour)
sprinkle of salt
8 Tbs (1 stick) unsalted butter
1/4 cup sour cream or full-fat Greek yogurt (I only had low fat and it worked just fine!)
1/2 Tbs white vinegar
2-3 Tbs ice water (I needed more to get my dough to come together; just add slowly)
Filling
1 lb butternut squash, cubed and roasted
1 sweet onion
½ Tbs olive oil
1 Tbs butter + 1/ 2 Tbs olive oil
salt and pepper
pinch of sugar
sprinkling of cayenne pepper (optional, but yummy)
2 tsp or more of dried thyme (bit more if you’re using fresh)
1 cup shredded Fontina cheese (gruyere, emmental, beaufort, edam, gouda, & provolone should all work as substitutes, but I've not tried them, so I can't be sure!)
1 egg yolk beaten w/ 1 tsp water (optional; for glazing the pastry before baking to give it a pretty finish)
Make your pastry first. Combine the flour and salt in a medium-large bowl. Add the stick of butter and break it up with a pastry blender or two sharp knives until you have a cornmeal-like texture. There will be some bigger and some smaller chunks of butter remaining; that's fine, just don't let the big chunks be bigger than like a pea. The butter chunks are what will give your pastry lovely layers and flakiness! Whisk the yogurt/sour cream, vinegar, and water together in a small bowl; poor into the flour mixture. Gently mash it all together with a rubber spatula until a dough forms. If need be, add a bit more water. You want everything to come together, but not be sticky. Knead it once or twice if you need to to get it to form a nice dough-ball. Wrap in plastic and chill for at least an hour and up to 2 days.
While your dough chills, prepare the filling*. Preheat the oven to 400*, peel the squash, half it, remove the seeds (and save them to bake up later for a delicious snack!), and cut the squash into nice 1/2-inchish chunks. Cover a baking sheet in foil and then spray with olive oil or lightly coat the foil with olive oil using a paper towel to rub it all around. Lay out the squash pieces, sprinkle with salt and pepper, and bake until tender (about 30 minutes). Shake the pan around once or twice during the baking to make sure things don't stick and everyone cooks evenly.
While the squash bakes, prepare your onion. Peel the onion. Slice in half and then slice into thin half-moons. In a large pan, melt your butter and 1/2 Tbs of olive oil over low/medium heat. Add your onion slices and sprinkle with the sugar, the cayenne pepper if you're using it, and a bit of salt. Cook until soft and tender, gently stirring every now and then. This should take about 25ish minutes.
Mix the squash, onions, shredded cheese, and herbs together in a bowl and set aside.
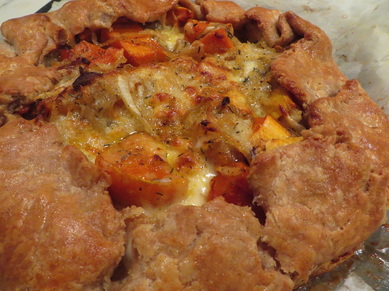
Roll out your pastry on a floured work surface. Roll into a nice circle, about 1/4 inch thick. If you didn't leave your oven on after finishing the squash, turn it back on now, at 400*. Move your rolled out pastry to a parchment-lined baking sheet. Spoon the filling evenly into the center, leaving about 2+ inches as a border. Fold the border up over the filling (there WILL be hole in the middle where the filling peaks through - see picture at top!). If using, brush the pastry border with the egg wash and place the galette into the oven. Bake for 30-40 minutes until golden-brown. Let stand for a couple of minutes while you revel in all its autumn glory. Cut and consume. (Delicious as a left-over too!)
*I had the whole day to make this, so I really spaced things out. You could, however, do a similar thing, preparing the pastry one day, the squash another, and then just finishing the onions and throwing everything together to bake on another day. Additionally, the pastry should freeze just fine too, but I would flatten it out a bit into more of a disc before wrapping in plastic wrap and freezing for a quicker, more uniform thaw. :)
This recipe will be a staple at our table for the next few months, until warm weather returns and it’s time to start embracing raw veggies again. The only change we would make? Husband would like sausage. I actually agree with him. This dish is just perfect as is, but a nice appley-sausage would put it over the top. We’ll definitely be trying that next time (i.e. next week!). Oh! I also halved the original recipe, not sure how we’d like it – COLOSSAL mistake. So, you can easily double it and make two galettes (fancy word for essentially an open “pie”), or you can make one really huge one.
Butternut Squash & Caramelized Onion Galette
from Smitten Kitchen Cookbook
Pastry
1 1/4 cups whole wheat pastry flour (I used about half whole wheat pastry, and half sprouted whole wheat flour)
sprinkle of salt
8 Tbs (1 stick) unsalted butter
1/4 cup sour cream or full-fat Greek yogurt (I only had low fat and it worked just fine!)
1/2 Tbs white vinegar
2-3 Tbs ice water (I needed more to get my dough to come together; just add slowly)
Filling
1 lb butternut squash, cubed and roasted
1 sweet onion
½ Tbs olive oil
1 Tbs butter + 1/ 2 Tbs olive oil
salt and pepper
pinch of sugar
sprinkling of cayenne pepper (optional, but yummy)
2 tsp or more of dried thyme (bit more if you’re using fresh)
1 cup shredded Fontina cheese (gruyere, emmental, beaufort, edam, gouda, & provolone should all work as substitutes, but I've not tried them, so I can't be sure!)
1 egg yolk beaten w/ 1 tsp water (optional; for glazing the pastry before baking to give it a pretty finish)
Make your pastry first. Combine the flour and salt in a medium-large bowl. Add the stick of butter and break it up with a pastry blender or two sharp knives until you have a cornmeal-like texture. There will be some bigger and some smaller chunks of butter remaining; that's fine, just don't let the big chunks be bigger than like a pea. The butter chunks are what will give your pastry lovely layers and flakiness! Whisk the yogurt/sour cream, vinegar, and water together in a small bowl; poor into the flour mixture. Gently mash it all together with a rubber spatula until a dough forms. If need be, add a bit more water. You want everything to come together, but not be sticky. Knead it once or twice if you need to to get it to form a nice dough-ball. Wrap in plastic and chill for at least an hour and up to 2 days.
While your dough chills, prepare the filling*. Preheat the oven to 400*, peel the squash, half it, remove the seeds (and save them to bake up later for a delicious snack!), and cut the squash into nice 1/2-inchish chunks. Cover a baking sheet in foil and then spray with olive oil or lightly coat the foil with olive oil using a paper towel to rub it all around. Lay out the squash pieces, sprinkle with salt and pepper, and bake until tender (about 30 minutes). Shake the pan around once or twice during the baking to make sure things don't stick and everyone cooks evenly.
While the squash bakes, prepare your onion. Peel the onion. Slice in half and then slice into thin half-moons. In a large pan, melt your butter and 1/2 Tbs of olive oil over low/medium heat. Add your onion slices and sprinkle with the sugar, the cayenne pepper if you're using it, and a bit of salt. Cook until soft and tender, gently stirring every now and then. This should take about 25ish minutes.
Mix the squash, onions, shredded cheese, and herbs together in a bowl and set aside.
Roll out your pastry on a floured work surface. Roll into a nice circle, about 1/4 inch thick. If you didn't leave your oven on after finishing the squash, turn it back on now, at 400*. Move your rolled out pastry to a parchment-lined baking sheet. Spoon the filling evenly into the center, leaving about 2+ inches as a border. Fold the border up over the filling (there WILL be hole in the middle where the filling peaks through - see picture at top!). If using, brush the pastry border with the egg wash and place the galette into the oven. Bake for 30-40 minutes until golden-brown. Let stand for a couple of minutes while you revel in all its autumn glory. Cut and consume. (Delicious as a left-over too!)
*I had the whole day to make this, so I really spaced things out. You could, however, do a similar thing, preparing the pastry one day, the squash another, and then just finishing the onions and throwing everything together to bake on another day. Additionally, the pastry should freeze just fine too, but I would flatten it out a bit into more of a disc before wrapping in plastic wrap and freezing for a quicker, more uniform thaw. :)